Introduction
The starch hydrolysis test is a biochemical assay used to determine the ability of microorganisms to hydrolyze starch, a complex carbohydrate, into simpler forms. It is primarily employed in microbiology laboratories for the identification and classification of bacteria, particularly within the genus Bacillus.
Starch, a polysaccharide composed of glucose units, serves as an essential energy source for many organisms. However, not all bacteria possess the necessary enzymes, known as amylases, to break down starch. The starch hydrolysis test helps differentiate between those microorganisms that can hydrolyze starch (amylolytic) and those that cannot (non-amylolytic).
Purpose of the test
To assess whether an organism can hydrolyze starch or not.
Principle of starch hydrolysis test
Understanding Starch Hydrolysis
Starch is a complex carbohydrate, or polysaccharide, that serves as a major energy storage molecule in plants. It is abundantly found in various plant-based food sources, such as grains, tubers, and legumes. Chemically, starch is composed of two main components: amylose and amylopectin.
- Amylose: Amylose is a linear polymer of glucose units linked together by α-1,4-glycosidic bonds. It accounts for approximately 20-30% of starch content. Its linear structure allows it to form a helical shape, making it less soluble in water compared to amylopectin.
- Amylopectin: Amylopectin constitutes the majority of starch, contributing to around 70-80% of its composition. Unlike amylose, amylopectin has a highly branched structure due to the presence of α-1,6-glycosidic bonds in addition to α-1,4-glycosidic bonds. This branching enhances its solubility and makes it more readily available for enzymatic hydrolysis.
Explanation of the Principle Behind the Test
The principle of the starch hydrolysis test is based on the ability of microorganisms to produce enzymes called amylases, which can break down starch into simpler forms. This test helps to determine whether a microorganism possesses the necessary enzymatic machinery to hydrolyze starch or not.
The hydrolysis of starch occurs in two stages:
- Initial Stage: In the first stage, amylase enzymes, mainly α-amylase, act on the amorphous regions of starch, randomly cleaving the α-1,4-glycosidic bonds and producing smaller fragments called dextrins. α-Amylase is an endoamylase, meaning it cleaves the internal glycosidic bonds within the starch molecule.
- Final Stage: In the second stage, the action of another type of amylase called glucoamylase, or α-glucosidase, comes into play. Glucoamylase acts on the non-reducing ends of dextrins, further breaking them down into glucose molecules. This process is known as exoamylase activity.
Formation and Detection of Hydrolysis Products
The hydrolysis products formed during the starch hydrolysis test, including dextrins and glucose, are smaller and more soluble than the original starch molecule. As the amylase enzymes break down starch, the soluble hydrolysis products diffuse away from the bacterial colonies into the surrounding agar medium.
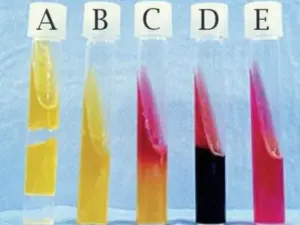
After incubation, the starch hydrolysis test is assessed for the presence of hydrolysis products. The agar medium is flooded with a reagent, commonly iodine, which reacts with any residual starch that remains unhydrolyzed. Areas, where starch remains intact, will turn dark blue or black due to the formation of a starch-iodine complex, indicating a negative starch hydrolysis result.
Conversely, if the starch has been hydrolyzed by the amylase enzymes produced by microorganisms, the agar medium surrounding the colonies will be devoid of intact starch. As a result, when flooded with iodine, the agar in these areas will remain light or clear, indicating a positive starch hydrolysis result.
Materials and Reagents
To perform the starch hydrolysis test, several materials are necessary. Here is a list of the essential items:
- Nutrient Agar or Starch Agar Plates: These solid media provide solid support for the growth of microorganisms and the incorporation of starch.
- Inoculating Loop or Needle: Used to transfer the microbial culture onto the agar plate.
- Incubator: Provides the controlled temperature necessary for the growth and metabolic activity of microorganisms. The typical incubation temperature for starch hydrolysis test is around 37°C (98.6°F).
- Autoclave: Required to sterilize the agar plates and any other media or equipment used in the test.
- Microbial Cultures: The test can be performed using pure cultures of microorganisms, which can be obtained from microbial culture collections or isolated from various sources.
- Iodine Solution: Iodine serves as a pH indicator in the starch hydrolysis test. It reacts with starch to form a dark blue or black color.
Quality control
Escherichia coli ATCC25922- Negative reaction, no clearing.
Bacillus subtilis ATCC6633- Positive reaction clearing colony around.
Preparation of cultural media
- Prepare the nutrient agar or starch agar plates following the manufacturer’s instructions. If using starch agar, add an appropriate amount of starch solution (around 1-2%) to the agar medium before autoclaving.
- Sterilize the agar plates and any other necessary equipment, such as inoculating loops or needles, by autoclaving or using a pressure cooker.
- Allow the sterilized agar plates to cool down to a temperature suitable for microbial growth, typically around 45-50°C (113-122°F). Ensure that the agar has solidified before proceeding.
Procedure for Starch Hydrolysis Test
- Inoculate the agar plates by streaking the surface with a microbial culture using a sterilized inoculating loop or needle. Ensure proper labeling of the plates to identify the microorganism being tested.
- Incubate the inoculated plates in an incubator set to the appropriate temperature, typically 37°C (98.6°F) for 48 hours
- Flood the surface of each plate with iodine solution, ensuring complete coverage. The iodine solution reacts with any unhydrolyzed starch, resulting in a dark blue or black coloration.
- Observe the plates for the presence or absence of clear zones around the microbial colonies. Clear zones indicate that starch has been hydrolyzed, while dark blue or black areas indicate the absence of hydrolysis.
- Record the results, noting the presence or absence of clear zones, and any other relevant observations.

Interpretation of Starch Hydrolysis Test
Positive Result: Clear Zone Formation
Negative Result: No Clear Zone Formation
| starch hydrolysis test positive bacteria | Starch hydrolysis (-ve) |
| Bacillus subtilis | Streptococcus agalactiae |
| Bacillus cereus | Staphylococcus epidermidis |
| Bacillus megaterium | Escherichia coli |
Limitations and Challenges
For comprehensive identification purposes, it is advisable to conduct biochemical, immunological, molecular, or mass spectrometry tests on colonies obtained from pure cultures.
It is important to note that after adding Gram’s iodine to the medium, colonies should not be subcultured. This precaution is necessary because Gram’s iodine is an oxidizing agent that can lead to cell death, making further subculturing unviable.
Precautions to be Taken During Test Setup
When setting up the starch hydrolysis test, it is essential to follow certain precautions to ensure accurate and reliable results. These precautions help minimize potential sources of error and ensure the integrity of the test. Here are some precautions to consider:
Conclusion
The starch hydrolysis test is a valuable tool in microbiology for assessing the ability of microorganisms to produce amylase enzymes and hydrolyzes starch. It provides insights into the enzymatic capabilities of microorganisms and aids in their identification and classification. Through the principle of starch hydrolysis, the test allows for the detection of clear zones around microbial colonies, indicating the breakdown of starch into smaller, soluble fragments.
References
- Cappuccino J.G. and Sherman N. 2008. Microbiology: A Laboratory Manual, 8th ed. Pearson Benjamin Cummings, San Francisco, CA, USA.
- Clinical Microbiology Procedures Handbook, Fourth Edition. (2016). In Clinical Microbiology Procedures Handbook, Fourth Edition. American Society of Microbiology. https://doi.org/10.1128/9781555818814
- Procop, G. W., Church, D. L., & Koneman, E. W. (2020). Koneman’s Color Atlas and Textbook of Diagnostic Microbiology. Jones & Bartlett Learning.