Introduction
Western blotting is a quick and very sensitive assay used in molecular biology. It is used for the characterization and detection of proteins. This method uses the inbuilt specificity of antigen-antibody interactions to identify specific antigens using polyclonal or monoclonal antibodies. Western blotting is also known as protein immunoblotting because an antibody is used selectively to detect its antigen.
In three steps, the process of western blotting is completed
- Protein separation by size
- Protein transfer to a solid support
- For the visualization, marking the target protein with the help of primary and secondary antibody
Western Blotting Principle
This technique is commonly used to detect a specific protein, as well as molecular weight of the protein. By using the process of SDS polyacrylamide gel electrophoresis (SDS-PAGE), sample proteins are separated according to their charge and size and migrated through the gel.
The separated proteins are then transferred onto a matrix commonly called as PVDF membrane or nitrocellulose. For the confirmation, either proteins are electro transferred or not, these are blotted on the membrane and incubated with a primary antibody that is specific for the antigen or protein of interest.
After this, secondary antibody is added to the membrane which is specific for the primary antibody. These secondary antibodies are covalently bound to an enzyme, i.e. horseradish peroxidase or alkaline phosphatase. These enzymes, after reacting to a chromogenic substrate, form a colored precipitate.
Finally, a visible band appears on the membrane, which indicates primary antibody is attached to the protein.

Steps of Western blotting
The following steps are involved in western blotting:
SDS-PAGE
Sodium dodecyl sulfate polyacrylamide gel electrophoresis (SDS-PAGE) is used to separate proteins on the basis of the molecular weight or size of the proteins. This is because the electrophoretic movement of the proteins is according to their size.
With the medium pH (in which proteins are suspended), the net charge of the proteins can be determined because proteins are amphoteric compounds. Hence, the separation of proteins by electrophoresis occurs by both size and charge of the molecules, under optimized conditions where proteins do not get denatured.
Protein molecules have high molecular weight, that’s why they need porous gels for separation. Polyacrylamide gels are porous and they can be used to separate proteins according to their size.
Western blotting
In the presence of a transfer buffer, shift the separated proteins from the polyacrylamide gel to the PVDF membrane or nitrocellulose. At this point of transfer, place the membrane and gel in between two filter papers just like a sandwich, and the gel will be kept above the membrane.
Then place this sandwich in between two sponge pads and after that keep it in a plastic cassette. Then place this whole set in a gel tank having cold transfer buffer. After the electro transfer, shift the separated proteins to the corresponding positions present on the membrane. On the membrane, immune detection of the protein of interest occurs.
Immunodetection
After the electrotransfer, identify the proteins bound to the membrane immunologically. Use a blocking reagent i.e. BSA or the nonfat dry milk to block the empty sites present on the membrane.
After that, by using primary antibody that is protein of interest specific, probe the membrane. The primary antibody binds to the protein/antigen and a complex of antigen-antibody forms on the membrane.
Wash the membrane for the removal of excess or unbound primary antibodies. Treat it with an enzyme labeled secondary antibody i.e. alkaline phosphatase or the Horseradish peroxidase; that binds with the primary antibody of the Ag-Ab complex.
At last, in a solution having either phosphatase or the peroxidase substrate, incubate the membrane. A colored band appears on the membrane where the Ag-Ab complex forms. Because of this, we can determine the molecular weight of the protein of interest.
Materials Required for Western Blot
Buffers and solutions
- 30% Acrylamide Bisacrylamide Solution (29:1)
- Tris-SDS Buffer 2.5X (pH 8.8)
- Tris-SDS Buffer 5X (pH 6.8)
- Pre-stained Protein Ladder
- Methanol
- Tris-Glycine SDS Gel Running Buffer 5X
- Sample Loading Buffer 5X
- Staining solution
- De-staining solution
- Ammonium persulphate (APS)
- Tetra methyl ethylenediamine (TEMED)
- Agarose
- Protein Sample
- Transfer Buffer
- Blocking Agent
- Diluent Buffer
- Assay Buffer
- Wash Buffer
- Primary antibody
- Secondary antibody
- TMB/H2O2
- Nitrocellulose membrane with filter paper
Glass wares
- Petri dish
- Conical flask
- Beaker
- Measuring cylinder
- Staining tray
Apparatus
- Gel rocker
- Protein Electrophoresis apparatus
- Power pack
- Blotting Apparatus
- Micropipettes
- Tips
- Hotplate
Preparation of buffer and solution
Preparation of 10% APS Solution
Dissolve Ammonium persulphate (0.15 g) in distilled water so final volume becomes 1.5 ml. Store it at 2-8˚C for 3 months.
Preparation of 1X Tris-Glycine-SDS Gel Running Buffer
Add 100 ml Tris-Glycine-SDS Gel Running Buffer 5X in 400 ml of sterile distilled water, for the preparation of 500 ml of 1X Tris-Glycine-SDS Gel Running buffer. Store it at 2-8˚C.
Preparation of 1X Assay Buffer
Add 5 ml of Assay Buffer 10X in 45 ml of sterile distilled water, for the preparation of 50 ml Assay Buffer 1X.
Preparation of 1X Transfer Buffer
To prepare 1000 ml of 1X Transfer Buffer, add 100 ml Transfer Buffer 10X in 700 ml of sterile distilled water and 200 ml methanol.
Preparation of Blocking Buffer
Add 0.2 g Blocking Agent in 20 ml Diluent Buffer, for the preparation of 20 ml Blocking Buffer
Preparation of 1X Wash Buffer
Add 100 ml Wash Buffer 10X in 900 ml sterile distilled water, for the preparation of 1000 ml Wash Buffer 1X.
Protocol of Western Blotting
(Day 1 steps)
SDS- PAGE
- Arrange the electrophoresis unit in a way that glass plates may clamped with the unit. At two vertical edges, place spacers in between them.
- Prepare 1% agarose by adding 0.05g agarose in 5 ml distilled water. Boil the mixture to completely dissolve the agarose. Then pour a thin horizontal layer of agarose into the plate lower edge. This seals the assembly. Let it cool down for 5-10 minutes so it may solidify.
- Prepare the Separating Gel 12% by adding the following components:
| Components | Quantity |
| Acrylamide bisacrylamide Solution 30% | 6.0 ml |
| Distilled water | 3.0 ml |
| Tris-SDS Buffer 2.5X (pH 8.8) | 6.0 ml |
| APS Solution 10% | 125 μl |
Pour the gel in between the plates and keep it to solidify for one hour. After pouring the gel, immediately add the distilled water to level the gel.
- After one hour, invert the casting assembly to take off the water.
- For preparing stacking gel add the following components:
| Components | Quantity |
| Acrylamide bisacrylamide Solution 30% | 1.30 ml |
| Distilled water | 5.10 ml |
| Tris-SDS Buffer 5X (pH 8.8) | 1.60 ml |
| APS Solution 10% | 75.0 μl |
| TEMED | 10.0 μl |
After adding TEMED, mix the components gently by slightly moving the beaker. Pour the Stacking gel above the separating gel. Place the comb immediately to avoid any air bubbles. It solidifies in half an hour.
Note: Always use gloves and wear a face mask because acrylamide is a neurotoxin and must be handled with care.
- After this, pour the Tris-Glycine SDS Gel Running Buffer 1X into the unit so that two electrodes may connected by the buffer and the flow of the current will be completed. Remove the comb from the stacking gel with great care.
- Take a protein sample of the required amount in a tube and boil it in a boiling water bath at 100˚C. Never try to boil the tube that contains the pre-stained Protein Ladder.
- Load the samples in alternative wells i.e. Lane 1: loaded with 5 μl pre-stained Protein Ladder; Lane 3: loaded with 20 μl Protein Sample; Lane 5: loaded with 20 μl Protein Sample.
- Connect power cord to the power supply i.e. Red-Anode and Black- Cathode. electrophoresis occurs at 90 mA and 120 volts, until the front of the dye reaches 0.5 cm above the sealing gel.
- Remove the Gel carefully from the plates using any spatula in a plastic tray having distilled water. Wash the gel for 1 min. Discard the water.
- Add 20 ml water to lane 1 and 3 of the gel pieces, and proceed the procedure of staining and de-staining.
- Cut the gel along lane 4. Transfer Lane 5 i.e. transfer protein sample in 10 ml cold Transfer buffer. Incubate for 10 minutes at Room Temperature and proceed the electro blotting process.
Staining and De-staining of Gel
- After the removal of water, add 50 ml of Staining Solution in the tray having gel, until bands become visible. Sometimes, the gel needs to be kept in the staining solution overnight for the visibility of the bands.
- Remove the gel from the Staining Solution. You can reuse Staining Solution for 2-3 times.
- Wash the gel with distilled water until an adequate amount of stain from the gel.
- Then add 50 ml of the Destaining Solution to the gel. Moderately shake the gel while doing destaining. Until distinct and clear bands are seen, continue to destain the gel.
- After that, remove the gel from the Destaining Solution. You can reuse the Destaining Solution for 2-3 times.
Electroblotting
- Assemble the gel with filter papers and nitrocellulose membrane.
- Place this blotting sandwich in the blotting cassette. Roll a glass tube on the membrane to avoid air bubbles between the nitrocellulose membrane and the gel.
- Place this cassette in a gel transfer apparatus and fill it with a cold transfer buffer. After that, connect the transfer unit to the power supply according to conventions.
- Perform electrophoresis of the sample for 2 hours at 300 mA, 150V for the blotting.
- From the blotting cassette, remove the nitrocellulose membrane after electrophoresis and place the membrane in 20 ml of Blocking Buffer 1X in a petri dish (having protein side up).
- Keep it at 40˚C for overnight.
Day 2 steps
Immunodetection:
- Discard the blocking buffer.
- Wash the membrane by using 20 ml of Wash Buffer 1X for 5 min. Wash it twice.
- Dip the membrane in 20 ml of Assay Buffer 1X. Add 4 μl of primary antibody solution and mix on a gel rocker for 1 hour gently. After that, discard the primary antibody solution.
- Wash the blot with 20 ml of Wash Buffer 1X for 5 min. Perform washing twice and each time discard the buffer.
- Then immerse the blot in 20 ml Assay Buffer 1X. Add 2 μl of HRP labeled secondary antibody and mixed gently for 1 hour. After mixing, discard the HRP labeled antibody solution.
- Wash the blot quickly with 20 ml of Wash Buffer 1X for 10 min. Perform washing twice and each time discard the buffer.
- After that, immerse the blot in 3 ml of substrate (TMB or H2O2) solution, and mix for 5-10 min. Colored band appear.
- Then remove the blot, wash with distilled water, and let it dry.
- Compare the SDS Polyacrylamide gel with the membrane developed.

Observations of western blotting
- Lane 1: A Prestained Protein Ladder
- Lane 3: Protein Sample
- Lane 4: Immunodetection on the blotted membrane
Results of western blotting
- The staining of SDS-Polyacrylamide gel results in different dark blue protein bands with a light blue colored background.
- Immunodetection shows a single blue band NC membrane.
Interpretation:
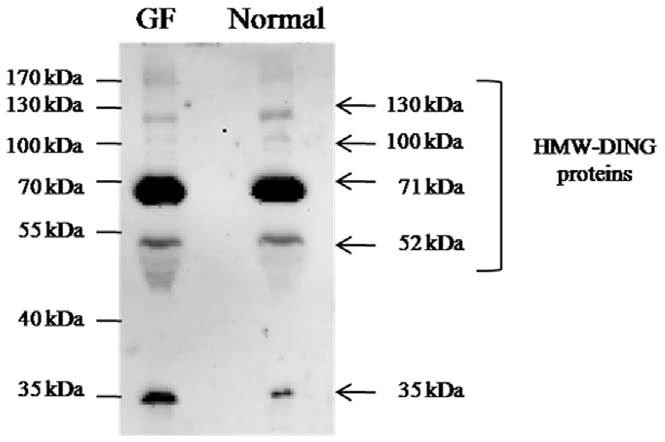
In the sample, many bands are observed after the staining and destaining of the gel. Bands are the bacterial crude cell lysate. Observe a A thick band, after Western blotting, on the nitrocellulose membrane that corresponds to the GST protein, detected with the anti-GST antibody. The GST protein has molecular weight of 26 kD and the position of band corresponds to size of protein.
Example:
Advantages of western blotting
- This test is very sensitive and it can detect small amounts of proteins.
- The gel electrophoresis as well as specific interactions of antibody-antigen helps in selective detection of target proteins.
- Western blotting is used for many applications i.e. protein-protein interactions, protein expression analysis, and post-translational modifications analysis.
- It can give semi-quantitative/quantitative data about the expression of protein levels.
- Western blots can be utilized many times as they can be re-probed and stored.
Disadvantages of western blotting
- False positive and false negative results can occur because of non-specific binding of antibody and incomplete transfer of proteins, respectively.
- Western blotting is an expensive process because of high cost of the specialized equipments, antibodies, and skilled personnel.
- In any step, even minor errors or any variations may affect the accuracy of results.
- It is a time consuming process, and the entire process may take many hours for completion.
- By using this technique, per assay, we can detect only one or a few proteins.
Application of western blotting
- This protocol helps in the identification of a specific protein in a complex mixture of proteins.
- The size as well as quantity of the targeted proteins can be estimated by using this method.
- Western blotting has an important role in the diagnosis of different diseases. It is usually utilized as HIV confirmatory test. This can help in determining either a patient is positive for HIV or not.
- It can also be used in the neurocysticercosis as well as tubercular meningitis diagnosis.
- Western blotting is used for the detection and analyzing of defective and abnormal proteins.
- It is utilized as a definitive test for the variant Creutzfeldt – Jakob disease (vCJD) and BSE Bovine spongiform encephalopathy (mad cow disease). Moreover, it is used for the diagnosis of HSV-2 (Herpes Type 2) infection, Hepatitis B infection, and tularemia as a confirmatory test.
Western blot troubleshooting
Some common observations, their possible sources and troubleshooting are as follows:
No Bands Observed
Possible Sources and suggestions:
- A low affinity of antibody to the protein of interest. To overcome this issue, increase the antibody concentration 2-4 folds compared to the recommended concentration.
- Insufficient protein can also affect the assay so increasing total amount of loaded protein on gel, can solve the issue.
- Make sure PVDF or the nitrocellulose membrane is properly wetted in the methanol or the transfer buffer, respectively.
- Ensure a good contact between the gel and the membrane.
- Optimize the transfer time, as proteins with higher molecular weight may need more transfer time. Stain the membrane for the confirmation of complete transfer.
- Reduce the voltage and time of transfer for proteins having lower molecular weight (<10 kDa).
- Confirm the host species along with Immunoglobulin type of the primary antibody.
- Make sure that the buffers do not have Sodium Azide, because it may affect the HRP signal.
Faint Bands (Weak Signal)
Possible Sources and suggestions:
- Reduce the number of washes to the minimum.
- Decrease the NaCl concentration in the blotting buffer as well as in the antibody solution.
- Increase the antibody concentration 2-4 folds.
- Increase the total protein amount loaded on the gel.
- Pour enzyme and the substrate in a tube and mix. If there is no color development or if it is weak, purchase or prepare new or fresh reagents. Prefer to switch to ECL.
- Decrease Milk percentage in the blocking as well as in the antibody solutions or the substitute having 3% BSA.
Extra Bands
Possible Source:
- Reduce the concentration of the primary antibody.
- Run a control with only secondary antibody (exclude primary antibody). Use an alternative secondary antibody if bands develop; use either monospecific or antigen affinity-purified antibodies.
- Add Tween 20 (0.1-0.5%) to the primary or secondary Ab solution.
- As a starting point, use 2% nonfat dry milk in the blotting buffer for the dilution of primary and secondary Abs.
- Increase number of washes.
- Increase DTT amount for the confirmation of disulfide bonds proper reduction.
- Make sure samples are fresh and there is no contamination in the reagents.
High Background
Possible Sources and suggestions:
- Use either monospecific or antigen affinity-purified antibodies.
- Decrease the antibody concentration.
- Run a control only with the secondary Ab. Use an alternative secondary antibody if band develop.
- Adjust blocking conditions as needed.
Diffuse Bands
Possible Sources and suggestions:
- Reduce the amount of protein loaded.
White Bands (ECL method)
Possible Sources and suggestions
- Reduce the antibody or the protein concentration because high antibody or protein concentration may develop high localized signal, that may results in white bands development when expose to the film.
Patchy uneven spots all over the blot
Possible Sources and suggestions:
- Make fresh and contamination free reagents.
- Make sure that the membrane is completely immersed while washing and the antibody incubations.
- Remove air bubbles gently, especially during transfer.
- Perform agitation gently while placing on a shaker.
- Filter the Conjugate for the removal of HRP aggregates.
References
- Collombet, J.-M., M. Elias, G. Gotthard, E. Four, F. Renault, A. Joffre, D. Baubichon, D. Rochu and E.J.P.O. Chabrière. 2010. Eukaryotic DING proteins are endogenous: an immunohistological study in mouse tissues. 5:e9099.
- Enever, C., T. Batuwangala, C. Plummer and A.J.C.o.i.b. Sepp. 2009. Next generation immunotherapeutics—honing the magic bullet. 20:405-411.
- Mohammad, G.H. 2016. Pyruvate Kinase M2 (PKM2) and Lactate Dehydrogenase A (LDHA) as Novel Diagnostic Markers and Therapeutic Targets for Pancreatic Cancer, UCL (University College London).